Tuning apache2 with apache2buddy
Apache and Nginx are two of the most popular web servers in the open source community. between them, they are responsible for serving over half of the traffic on the internet. Both services have Pros and Cons that need to be taken into account when working out which solution to implement. This article explains how you can use apache2buddy to help tune your Apache2 installation when your dealing with large web applications or large volumes of traffic.
With most Linux distributions you can have apache web server installed and running with one command (“sudo apt-get install apache2” for a Debian/Ubuntu based OS or “sudo yum install httpd” for a Redhat/CentOS based OS).
Apache itself can handle most web sites/applications without much configuration, however for resource intensive web apps or those under high load apache may need to be tuned to maintain performance and uptime. As this process can be difficult, time consuming, and error prone if done manually, most Linux system administrators turn to a tool called apache2buddy (a fork of apachebuddy). This tool can do more for your web server in a matter of seconds than manual tuning is likely to achieve with hours of combing through configuration and log files.
To make sure you always have the last word, apache2buddy does not apply any changes directly. It will read through your configuration and log files and provide recommendations based on its findings, and it will be up to the administrator to implement the configuration changes.
Apache2buddy.pl will check for the following and much more
- PHP Memory Limits
- Memcache
- MaxClients
- Memory usage
- Max potential memory usage
- Percentage of total RAM allocated to Apache
- MaxRequestWorker
To download and run the script, follow the steps outlined below.
- Open a terminal window.
- Issue the command sudo su. (If you’re running a distribution that doesn’t use sudo, omit sudo from the command.)
- Type your sudo (or root) password and hit the Enter key on your keyboard.
- Issue the command curl -sL https://raw.githubusercontent.com/richardforth/apache2buddy/master/apache2buddy.pl | perl
- Allow the script to complete.
Once the script completes you will see results similar to those in this screenshot.
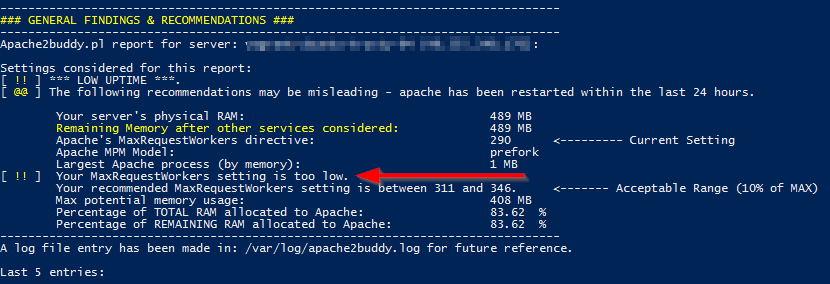
In the example above the results show that apache’s MaxRequestWorkers setting is too low, which could cause new connections to be rejected or even take apache down when under high load.
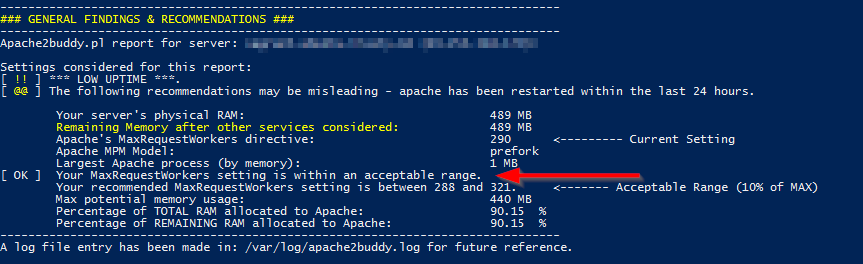
So after editing the mpm_prefork.conf and apache2.conf with the MaxRequestWorkers recommendation, I restarted the apache2 service and then ran the apache2buddy.pl script again to see the new results.
Please Note: if you increase MaxRequestWorkers past 250 you will also need to increase the ServerLimit as well, if you don’t apache will restrict MaxRequestWorkers to 250 due to the ServerLimit setting.
As you can see, Apache2Buddy now reports that the MaxRequestWorkers setting is within an acceptable range.
In the example above the only issue that Apache2Buddy could find was the MaxRequestWorkers setting. On a web server with PHP or other modules installed it would produce a lot more information.
You may also notice that in the screenshots you see the message *** LOW UPTIME ***. It is highly recommended that you run Apache2Buddy on a server that has been up and running for at least 24 hours to get the most accurate results.
Apache2Buddy is a tool that I highly recommend to help tune the performance of your apache2 web servers. In my experience I find that running this will help save you time locating potential performance issues/bottlenecks.
Give apache2buddy.pl a try, and see if it doesn’t drastically increase the performance of your Apache deployment.